Introduction
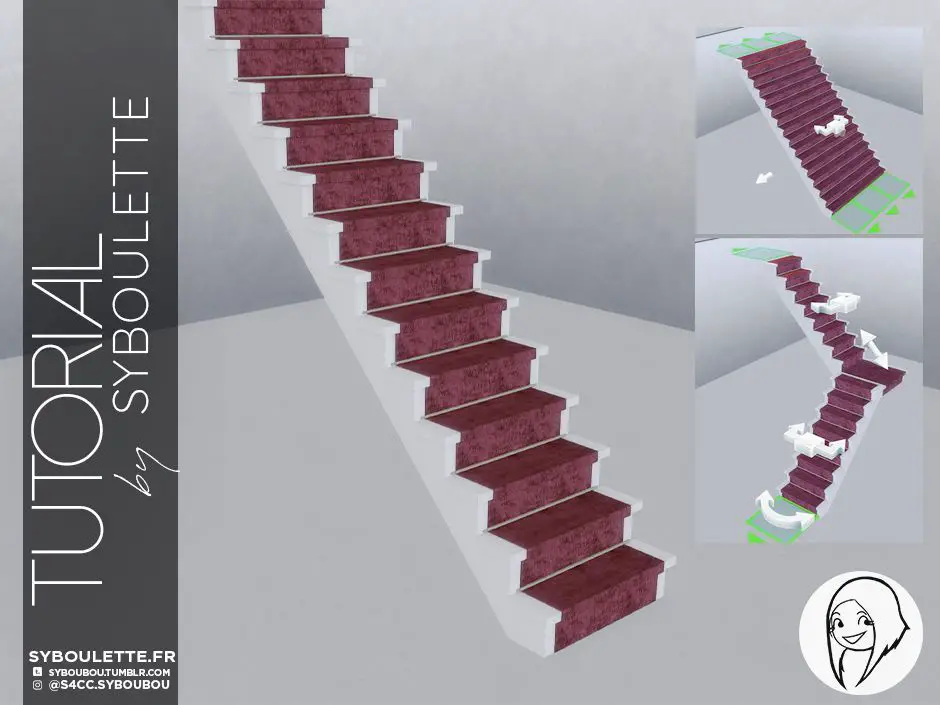
This tutorial will show you how to create a functional CC stair for the Sims 4 using TSRW, Sims 4 Studio and Blender.
I’m assuming if you follow this thread that you already know how Sims4studio works and that you’re familiar with the basics of making custom content. If not, I recommend learning first with the help of the tutorials you can find on youtube or on S4S forums. If you have questions or comments about the tutorial please post them in the comment section along with the number of the step you’re discussing.
This tutorial is rather advanced and will not show you how to create a new mesh.
Credits: I want to particularily thank Brujah from the S4S forum for helping me and explain how to achieve importing blender file into unrecognized package in S4S. Without that missing point my stairs would have stayed incomplete. Now they can be truly perfect !
Note: Qolygonal also made a tutorial about stairs, you might find additional informations there !
What do you need
- Sims 4 Studio
- TSR Workshop
- Blender 2.76 or 2.79
Step 1: Creating a stair package
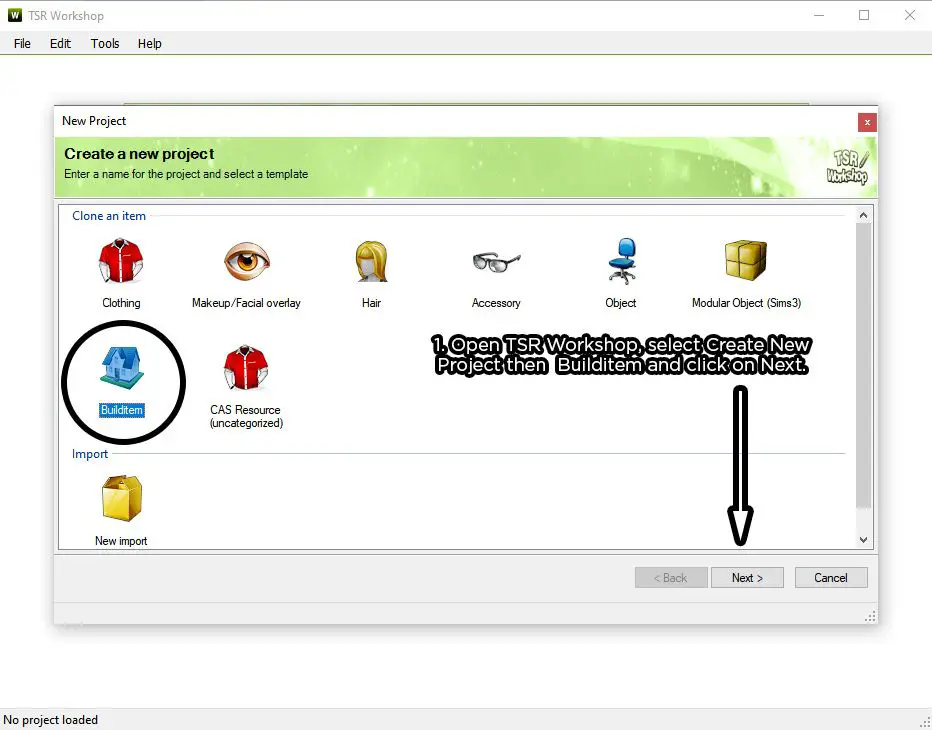
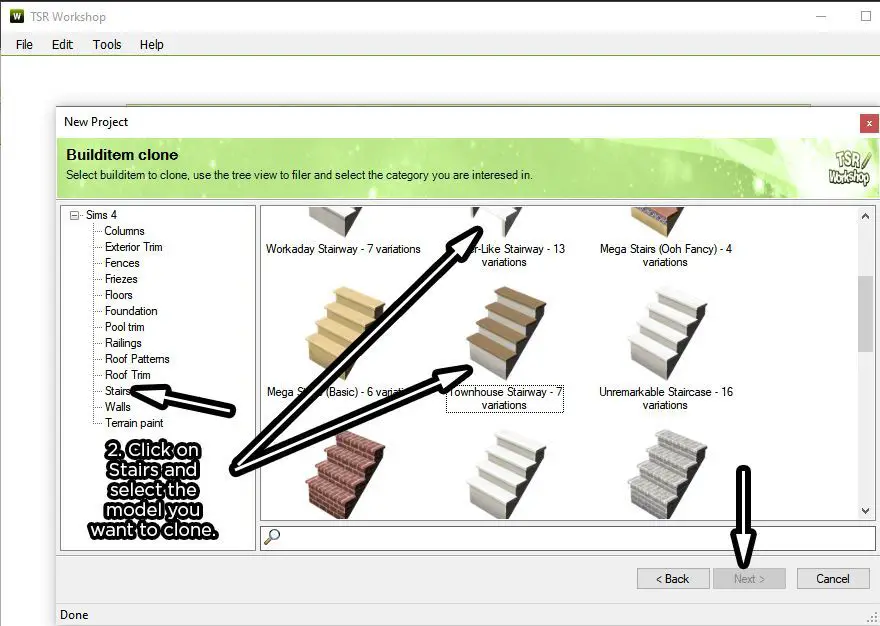
1. Open TSR Workshop, select Create New Project then Builditem and click on Next.
2. Click on Stairs and select the model you want to clone. There are actually two sort of models you will want to choose: one with wall included, or one without.
Note: I recommend to note the name of the staircase you want to clone ingame as the expansion packs required for those items are not shown in TSRW. So if you want a basegame item, you’ll need to clone a basegame staircase.
3. Enter the title of your item (Project name is for you and will not be shown. Title and description are in the contrary the one that will appears ingame). Click Next then Ok.
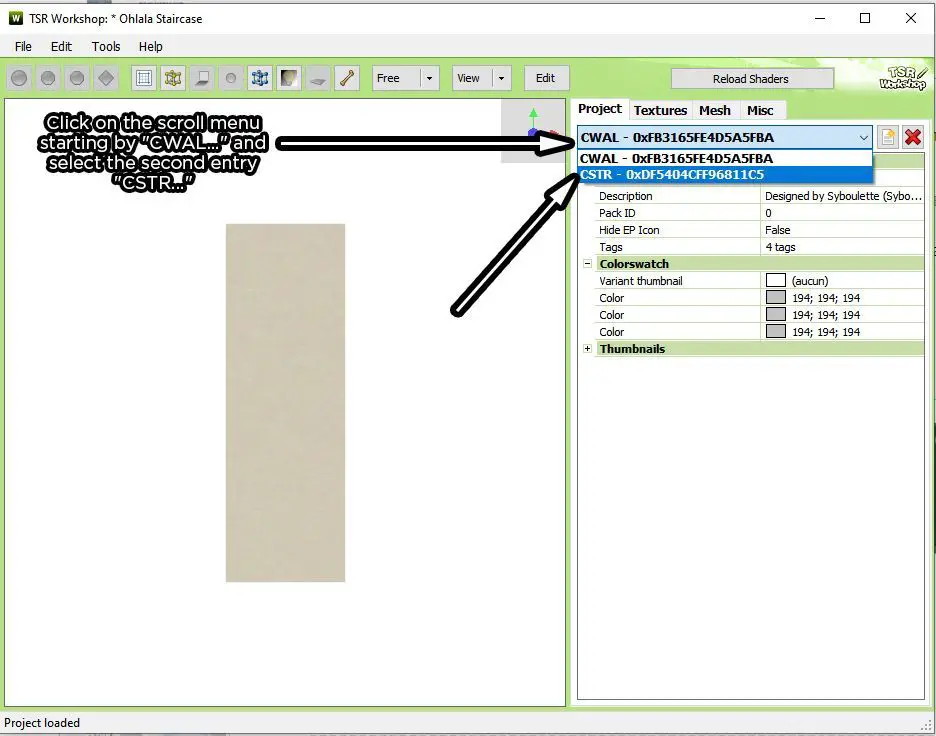
4. The UI of TSRW can be very confusing, slow to respond and buggy so naviguate carefully. We will first need to extract the original stair meshes to serve as guide for our new staircase. Click on the scroll menu starting by “CWAL…”* and select the second entry “CSTR…” You will have the stair now showing in the main window.
*If the model stairs you chose doesn’t have a wall, then the first and only entry will be CSTR right away.
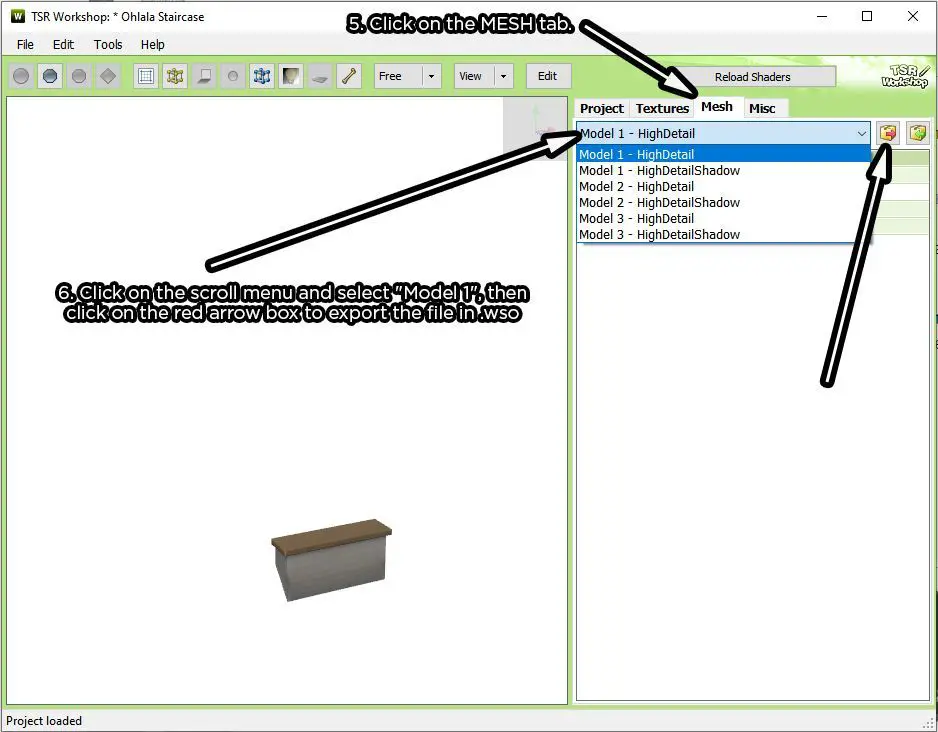
5. Click on the MESH tab. You will see that a stair is made up of three meshes:
Model1: first/last step (I think?)
Model2: a single step
Model 3: landing
6. Click on the scroll menu and select “Model 1“, then click on the red arrow box to export the file in .wso
7. Click again on the scroll menu, select “Model 2” and then click on export and save the .wso. Repeat again for Model 3. Do not worry about the shadow models.
Step 2: Editing your meshes
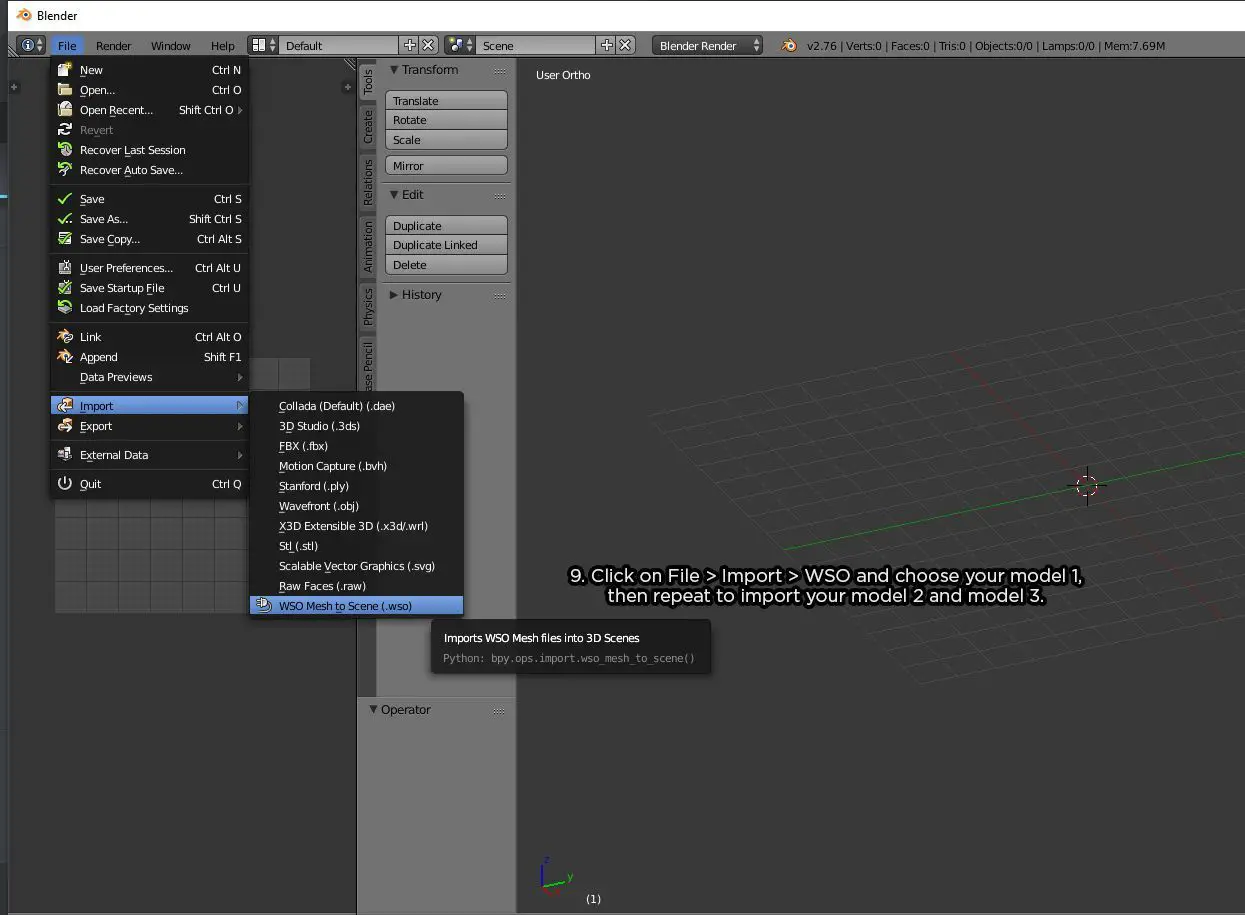
8. To open the .wso files in blender you’ll need to install the blender plugin provided with the TSRW installation folder.
Look for \Program Files (x86)\The Sims Resource\TSR Workshop\Extras\Blender 2.74\io_wso_export.py and copy the file (you can copy the export file if you wish but it doesn’t work !). Paste it into your blender plugin folder (\Program Files\Blender Foundation\Blender\2.76\scripts\addons)
9. Open Blender. Click on File > Import > WSO and choose your model 1, then repeat to import your model 2 and model 3.
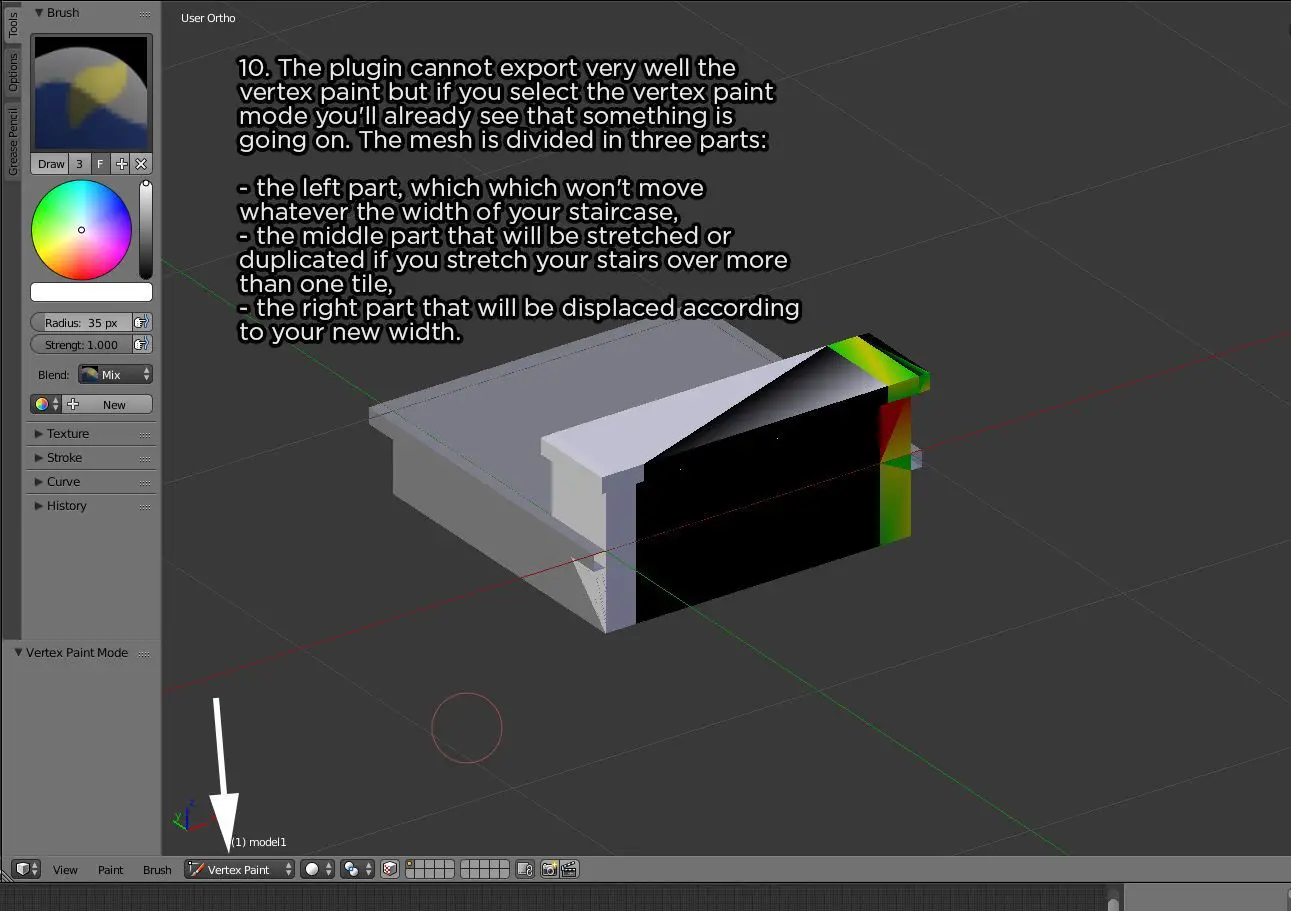
10. The plugin cannot export very well the vertex paint but if you select the vertex paint mode you’ll already see that something is going on. The mesh is divided in three parts:
- the left part*, which won’t move whatever the width of your staircase,
- the middle part* that will be stretched or duplicated if you stretch your stairs over more than one tile,
- the right part* that will be displaced according to your new width.
*When in front view (key 1 on numpad)
Note: If you choose to ignore the vertex painting, one tile straight staircase will work but larger width and landing won’t and will appear invisible.
11. Start by meshing the model 1, as the model 2 is the same version without a few faces. Keep in mind that you’ll need to cut it in 3 (by marking seam and by using [V] when seam edge is selected ) after modelling, so I strongly advise to mesh your model in quad so adding an edge loop at the end will be easier !
12. When you’re done with your model 1, you can mesh your model 3, keeping the same process.
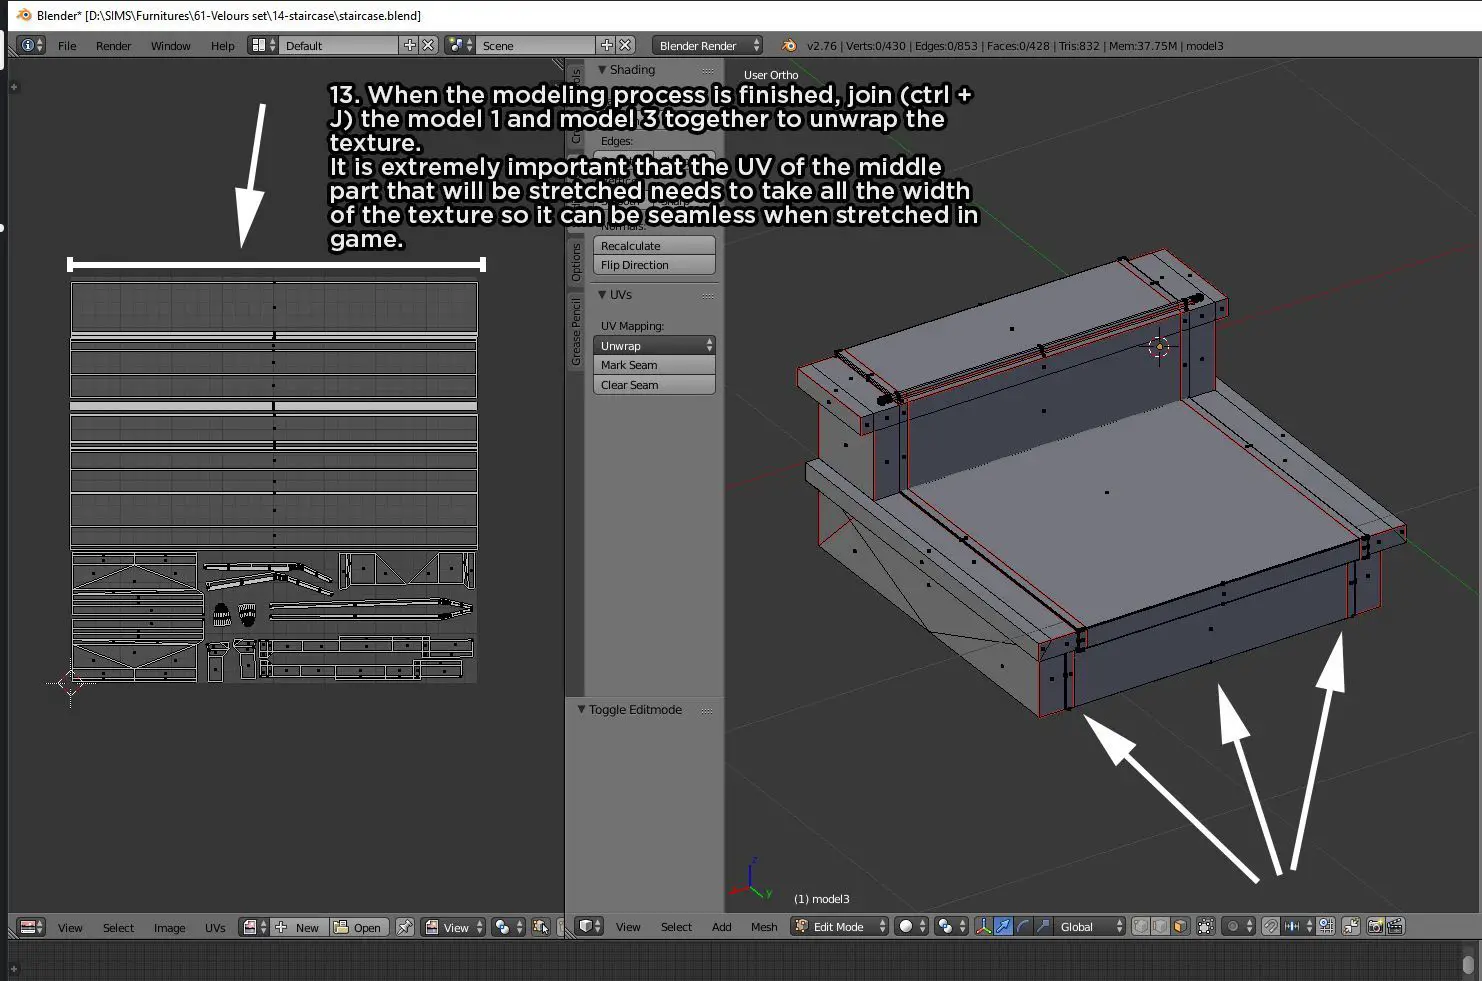
13. When the modeling process is finished, join (ctrl + J) the model 1 and model 3 together to unwrap the texture. It is extremely important that the UV of the middle part that will be stretched needs to take all the width of the UV MAP so it can be seamless when stretched in game, and needs to be “upside down”. Take a look at how the original model 3 your exported in TSRW is unwrapped for understand this better.
14. When everything is unwrapped and your UV is clean, you can separate again the model 1 and 3. Select the model 1 mesh and hit [P] > Selection.
15. Select the model 3 and enter in edit mod. Select the LEFT PART*, then enter in vertex paint mod.
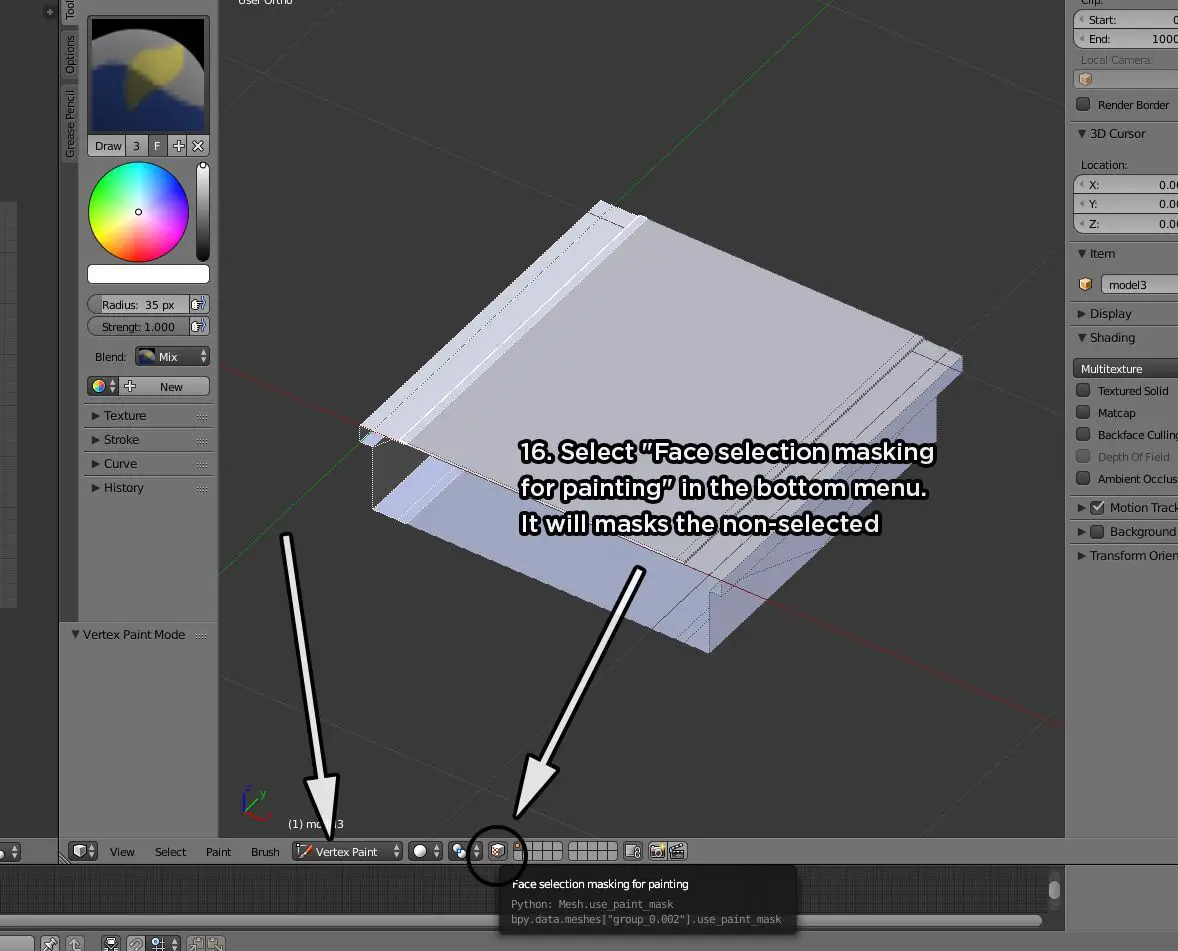
16. Select “Face selection masking for painting” in the bottom menu. It will masks the non-selected faces.
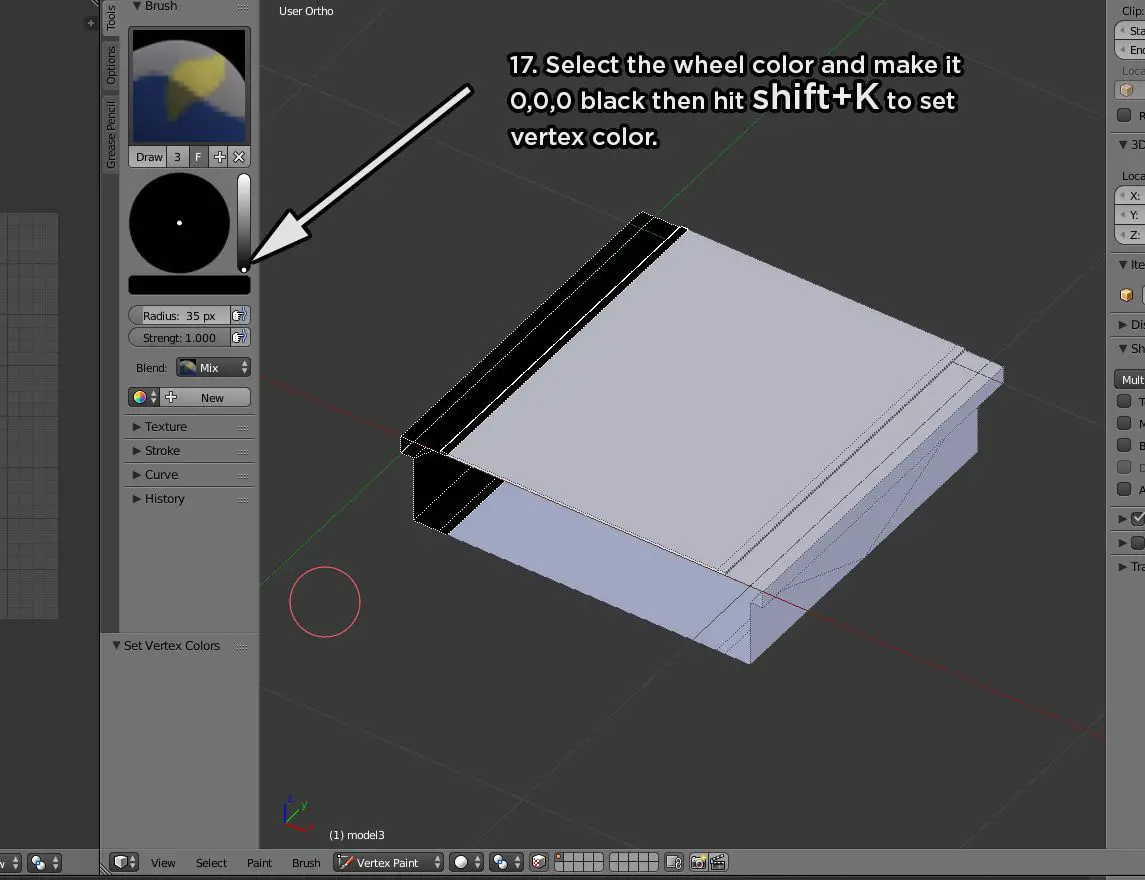
17. Select the wheel color and make it 0,0,0 black then hit shift+K to set vertex color.
18- Go back in edit mod, select the MIDDLE PART* and enter in vertex mod again.
19. Use the color wheel to choose the 0,0.5,0 green (put the cursor on white and enter manually for even more accurate green). Hit shift+K to set vertex color.
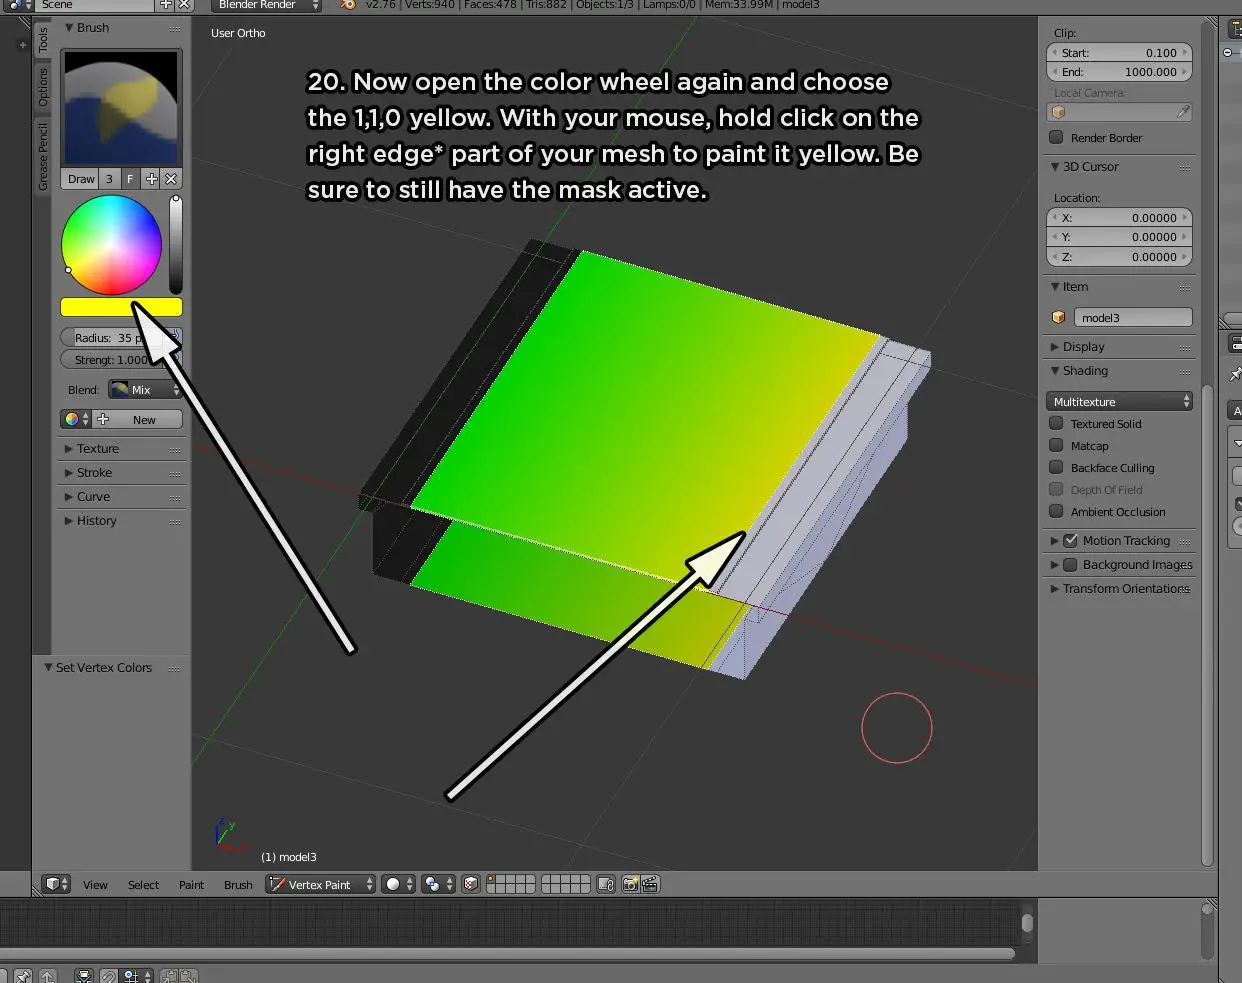
20. Now open the color wheel again and choose the 1,1,0 yellow. With your mouse, HOLD click on the right edge* part of your mesh to paint it yellow. Be sure to still have the mask active.
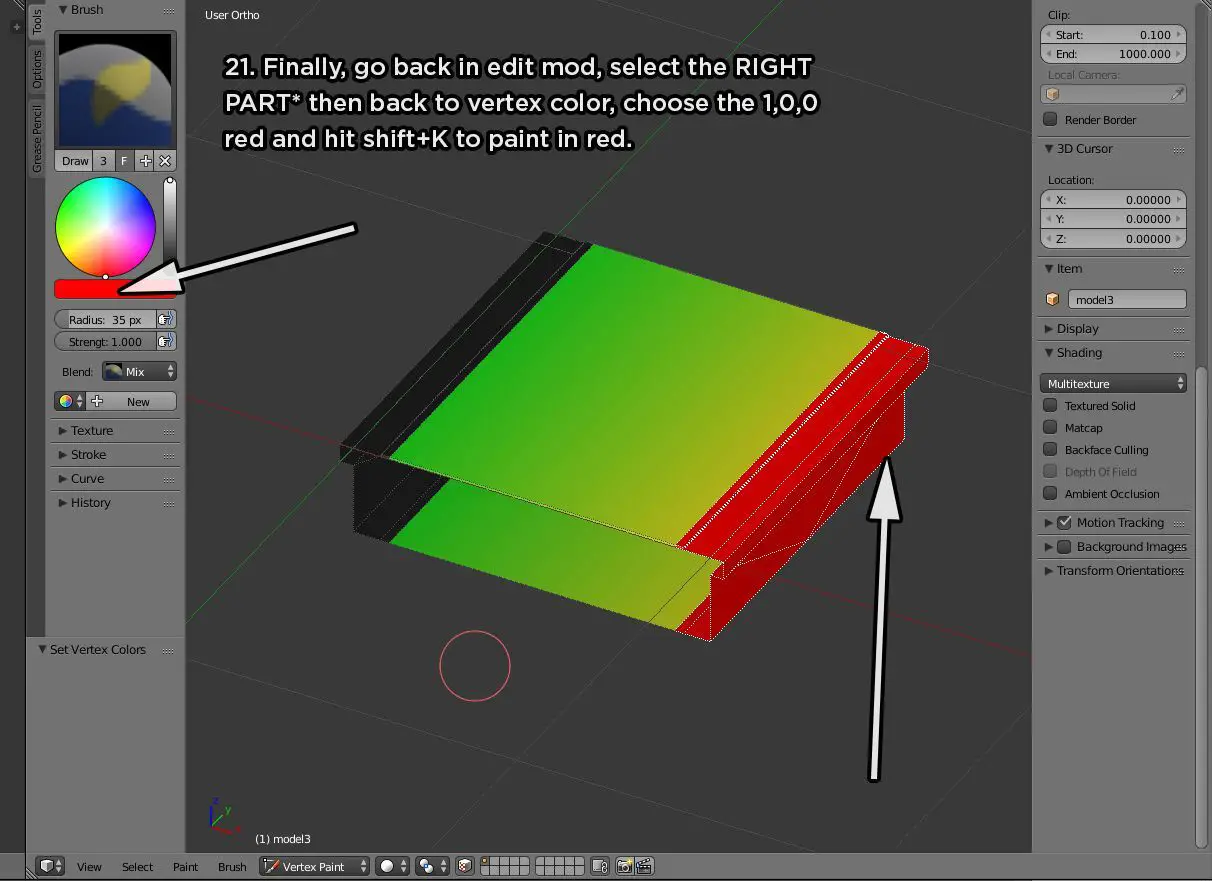
21. Finally, go back in edit mod, select the RIGHT PART* then back to vertex color, choose the 1,0,0 red and hit shift+K to paint in red.
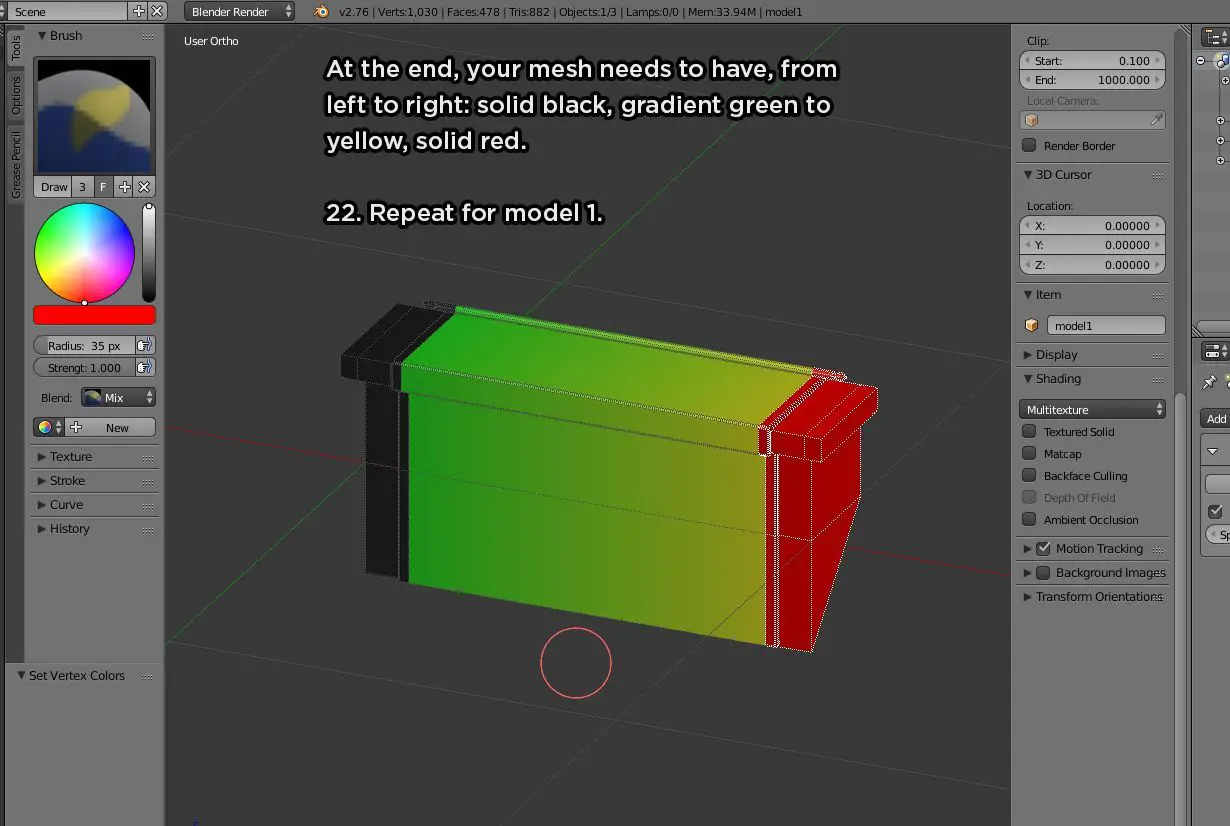
At the end, your mesh needs to have, from left to right: solid black, gradient green to yellow, solid red.
22. Repeat for model 1.
*When in front view (key 1 on numpad)
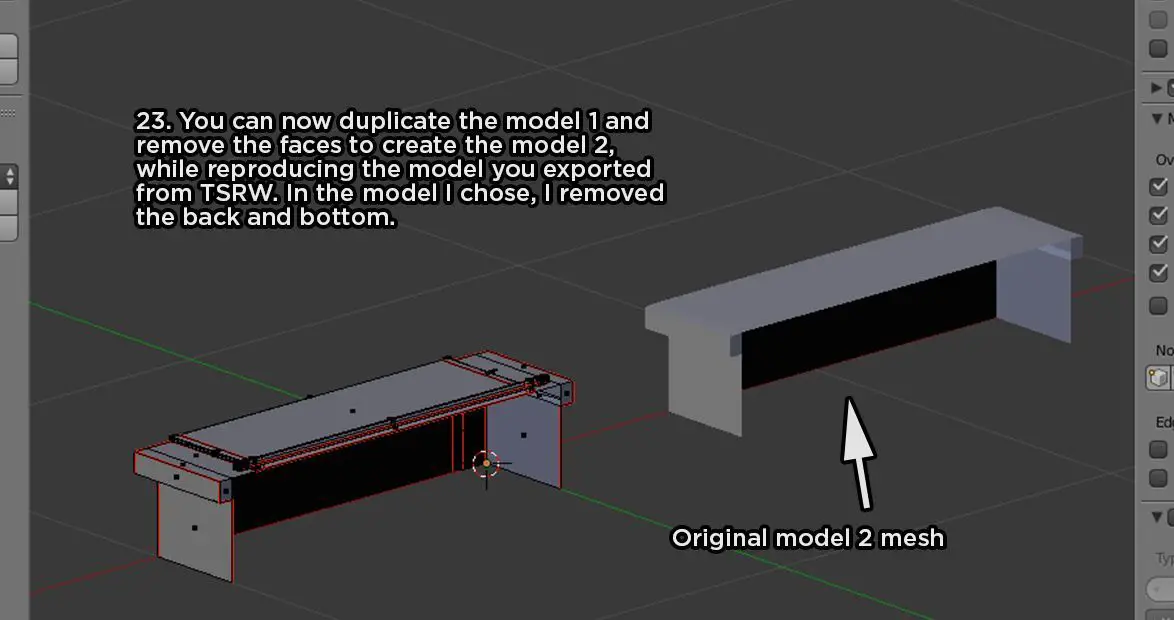
23. You can now duplicate the model 1 and remove the faces to create the model 2, while reproducing the model you exported from TSRW. In the model I chose, I removed the back and bottom.
24. Assign mesh cut to 0 for each model then save each mesh individually so each blender file has only one mesh inside (so 3 blender files with model 1, model 2 and model 3). You can also keep a version with 1 and 3 for baking the texture.
25. Join (ctrl+J) model 1 and 3 and bake your textures.

Step 3: Importing the textures in TSRW
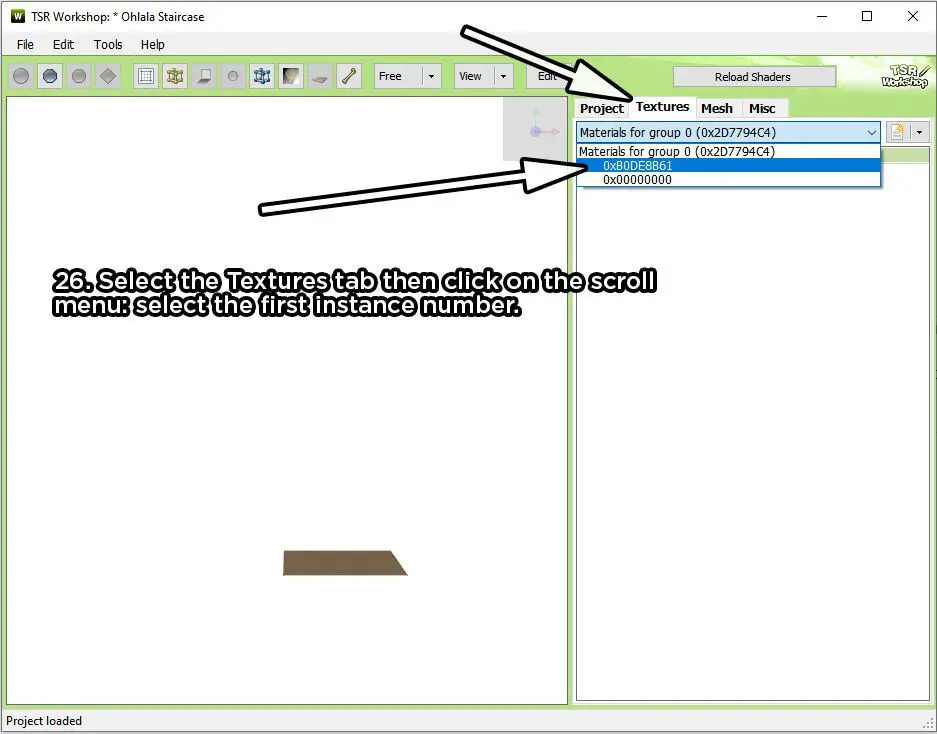
26. We can now import all the textures into TSRW. Select the Textures tab then click on the scroll menu: select the first instance number.
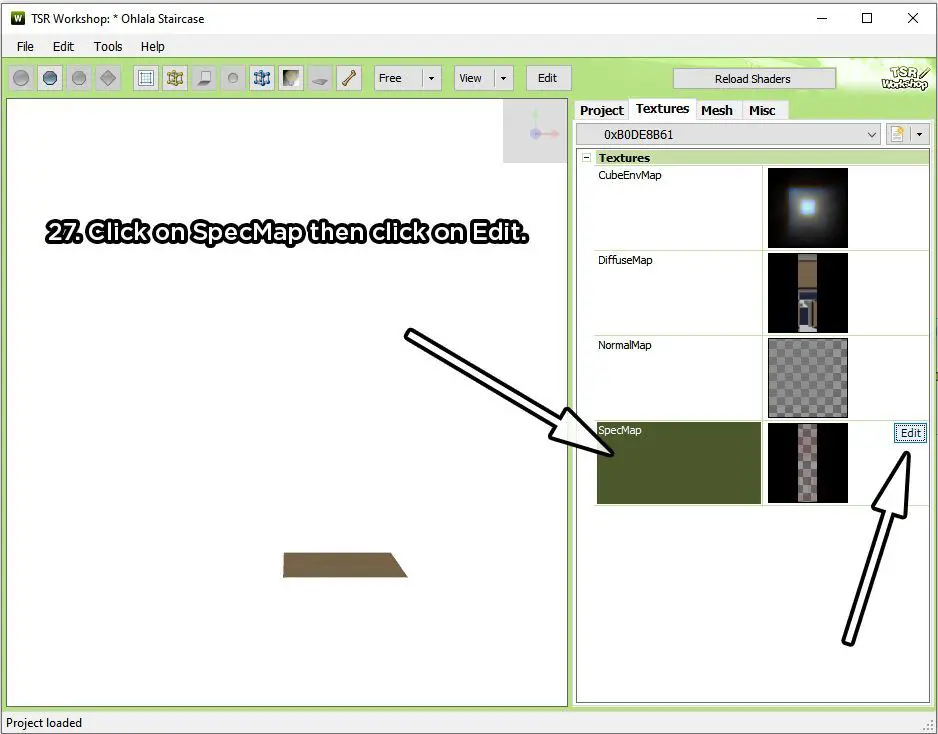
27. You can start by replacing the normal and specular map. By default, it doesn’t have a normal map so if you don’t have any specific bump information, you can let it as it is. Click on SpecMap then click on Edit.
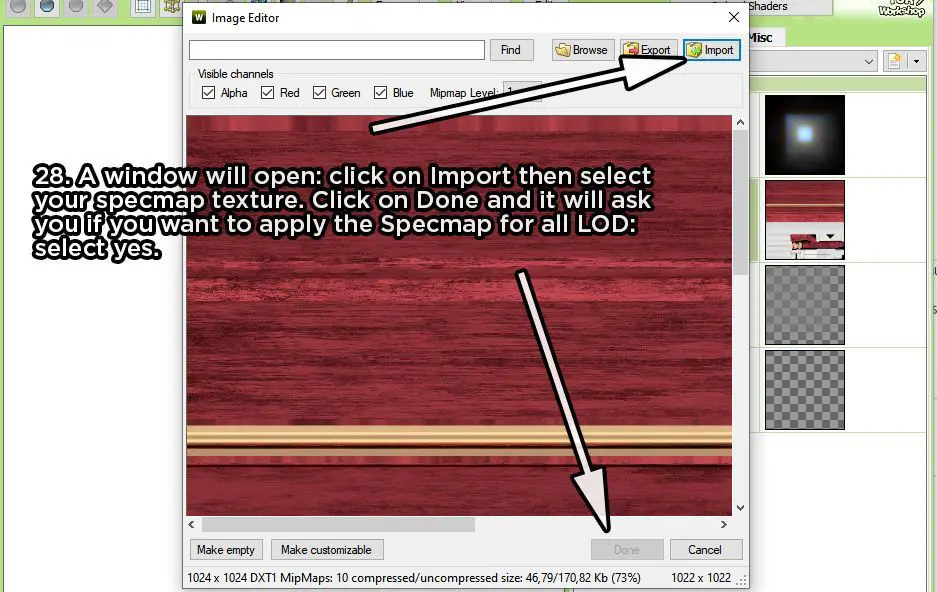
28. A window will open: click on Import then select your specmap texture. Click on Done and it will ask you if you want to apply the Specmap for all LOD: select yes.
29. Now click on the Diffusemap and then Edit. Click on Import and select your diffuse texture: it will shows in a new window, don’t toggle anything and click on Continue. The texture will appear in the window (it might take a little time if your texture is 1k or more). Click on Done: it will ask you if you want to update the Diffuse map for all LOD: select Yes.
Note: You might notice that TSWR does not automatically update the texture on the main viewport like S4S does. For that, you’ll need to click on the scroll menu, select the first instance number again and it will reload the texture.
30. Sometimes, it doesn’t save the first texture on the first try. To be sure and to not restart again, Save your file (ctrl + S), close (ctrl +W) and reopen (it should be in the Recent projects list). Click on the scroll menu in the project tab to select the CSTR ressource. If your texture shows, then you may continue, if not, restart from 26.
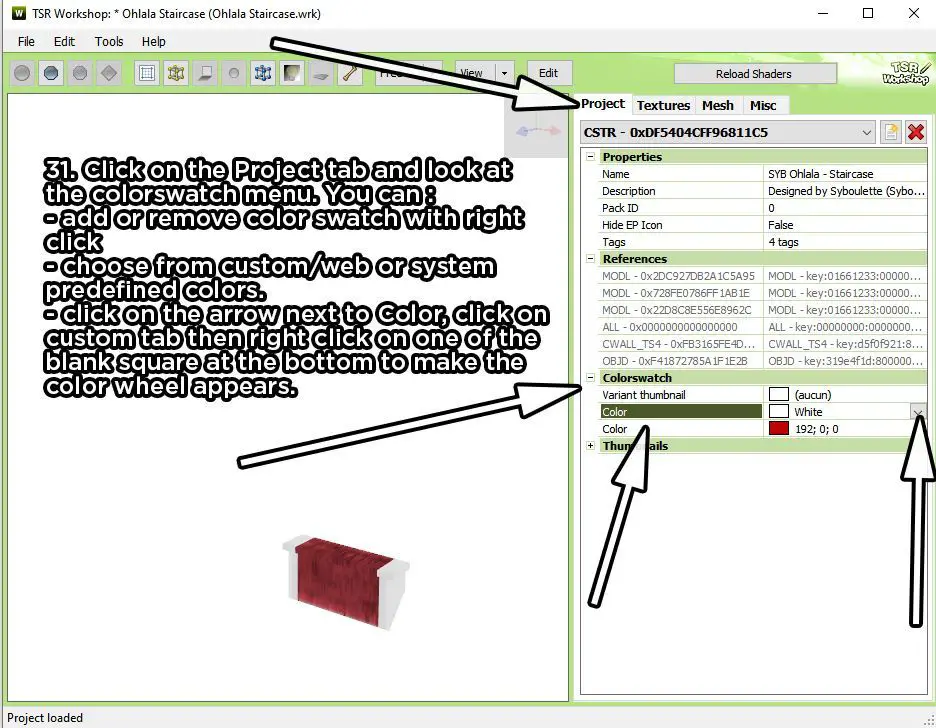
31. Now that we have our first texture, you may want to edit the color swatch. Click on the Project tab and look at the colorswatch menu: you can add or remove color swatch with right click and choose from custom/web or system predefined colors. If you want the color wheel, click on the arrow next to Color, click on custom tab then right click on one of the blank square at the bottom.
32. Now click on the little page on the right corner to create a new swatch. If you click on the scroll menu, you’ll see it has duplicated the ressource (both ressources if you’re using a walled staircase)
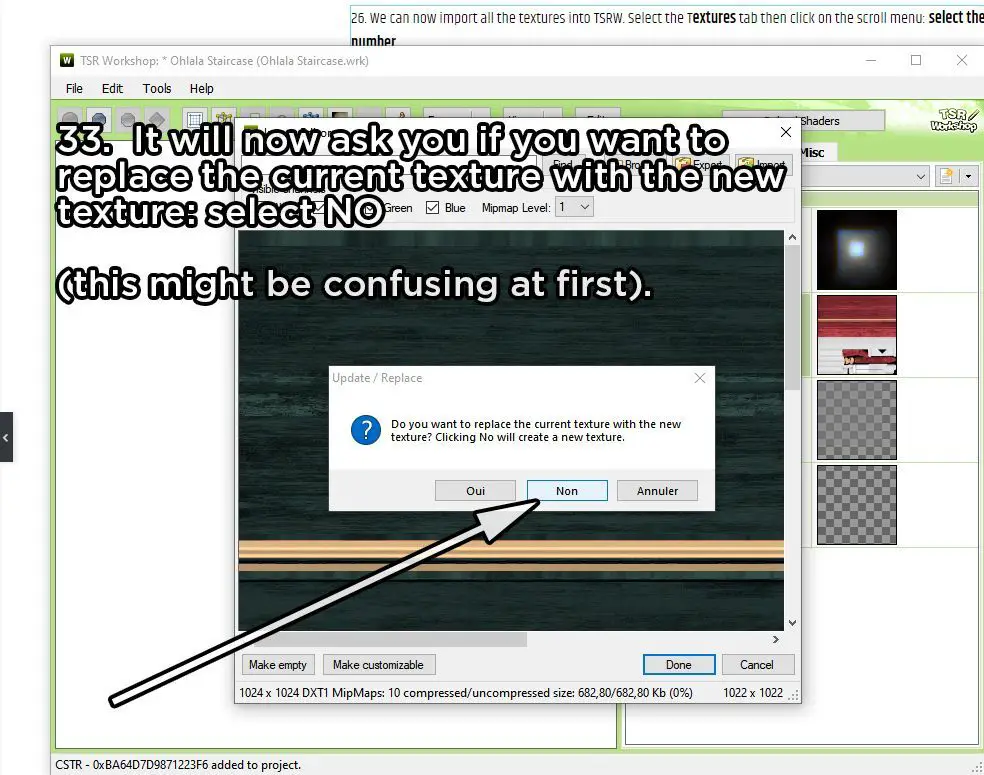
33. Go in the Textures Tab then click on the Scroll menu and select the first instance number. We will not have to replace all SpecMap as this has been done automatically. Instead, click on DiffuseMap and Edit. Click on Import, select your second texture, click continue and then Done. It will now ask you if you want to replace the current texture with the new texture: select NO (this might be confusing at first). It will then ask if you want to replace each LOD, click YES. (Don’t go too fast on those windows…).
34. Same as before, you’ll need to click on the scroll menu>first instance number if you want to refresh the viewport. This is not necessary, this is only if you want to see the texture.
Click on Project tab, then edit your colorswatch.
35. Repeat the operation from 31 to 34 for each new color swatch you need to add.
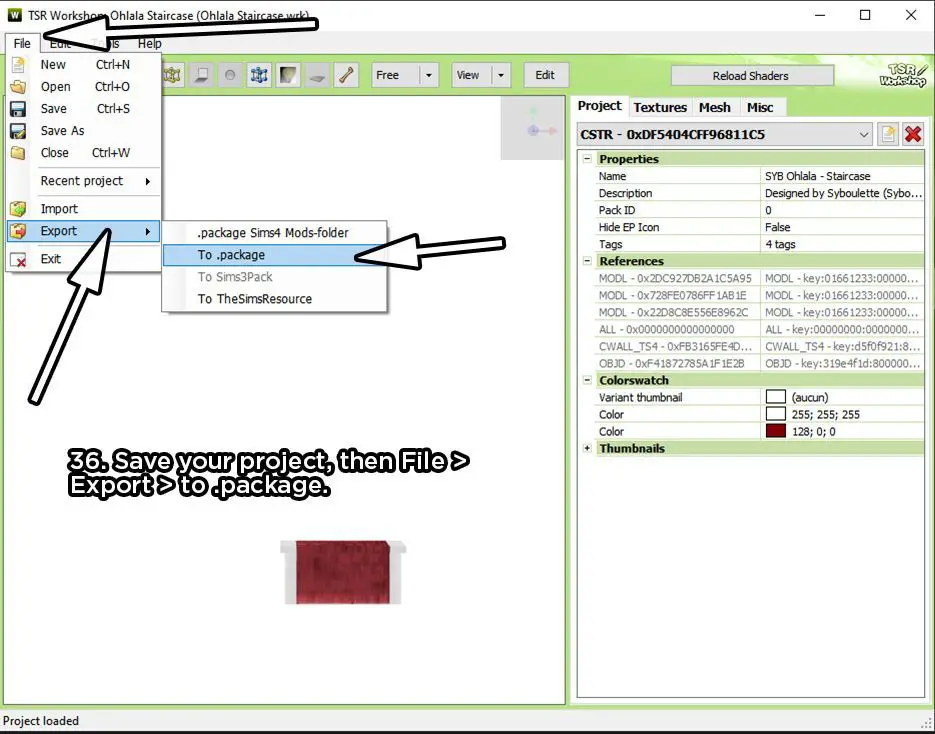
36. We don’t need to replace the mesh now, as TSWR can’t import blender file (the plugin does not work and the importation of .obj neither). The next steps will continue in Sims4Studio software instead. Save your project, then File > Export > to .package.
Note: I used to use Milkshape as a bridge to export blender file in .obj, reimport in Milkshape, export in .wso then import into TSRW. But .obj format did not retain vertex paint so I could only change the steps and had to sacrifice the landing that would need to stay the original for it functions correctly. I could still change its texture so it was blending but the technique i’m gonna show you next can prevent this.


Step 4: Importing the meshes and finishing the settings in Sims 4 Studio
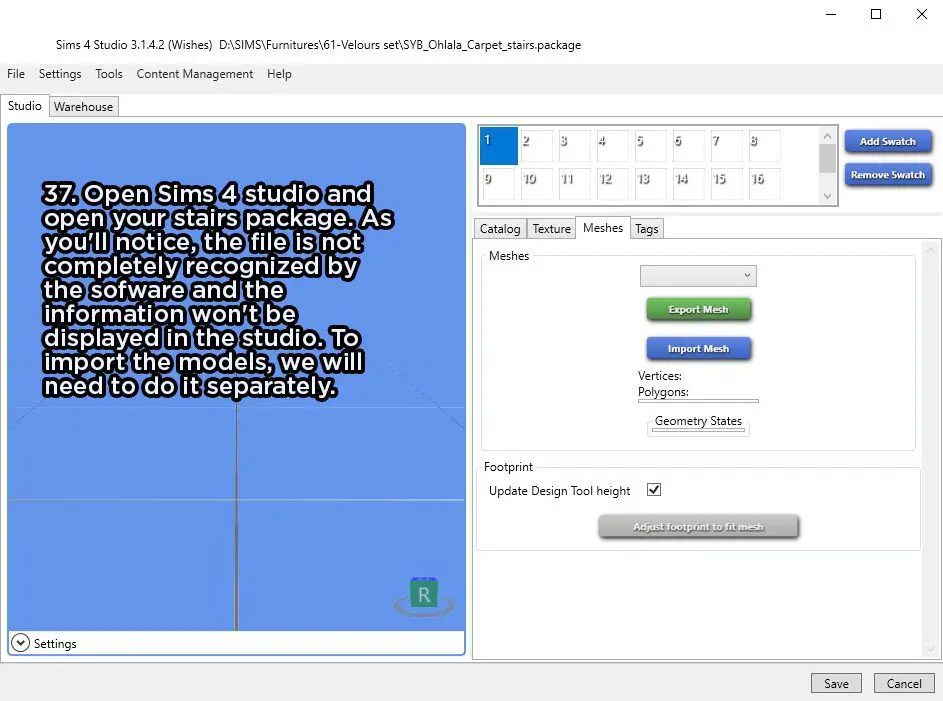
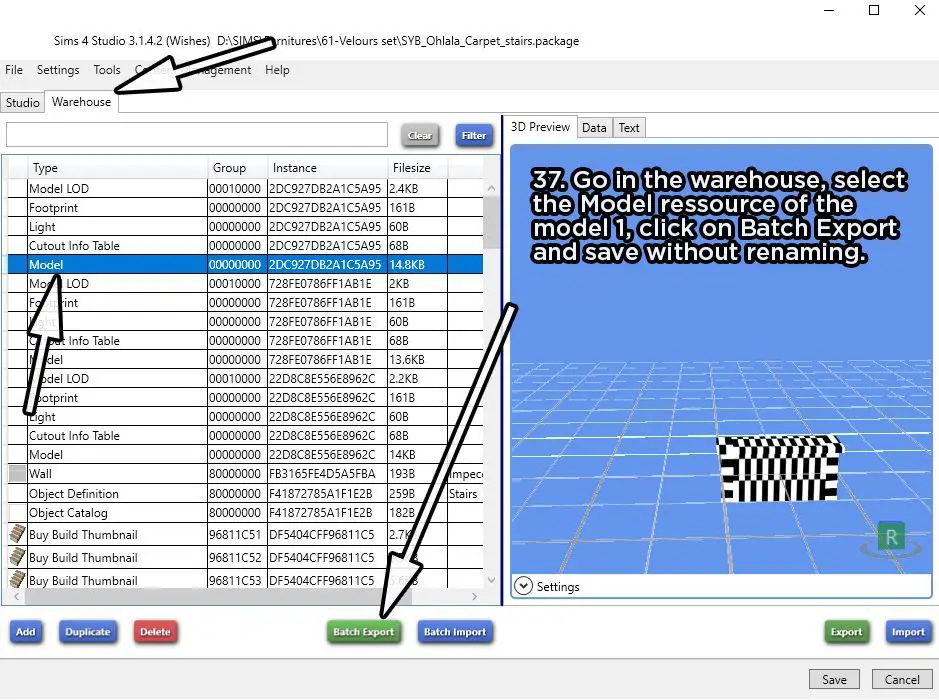
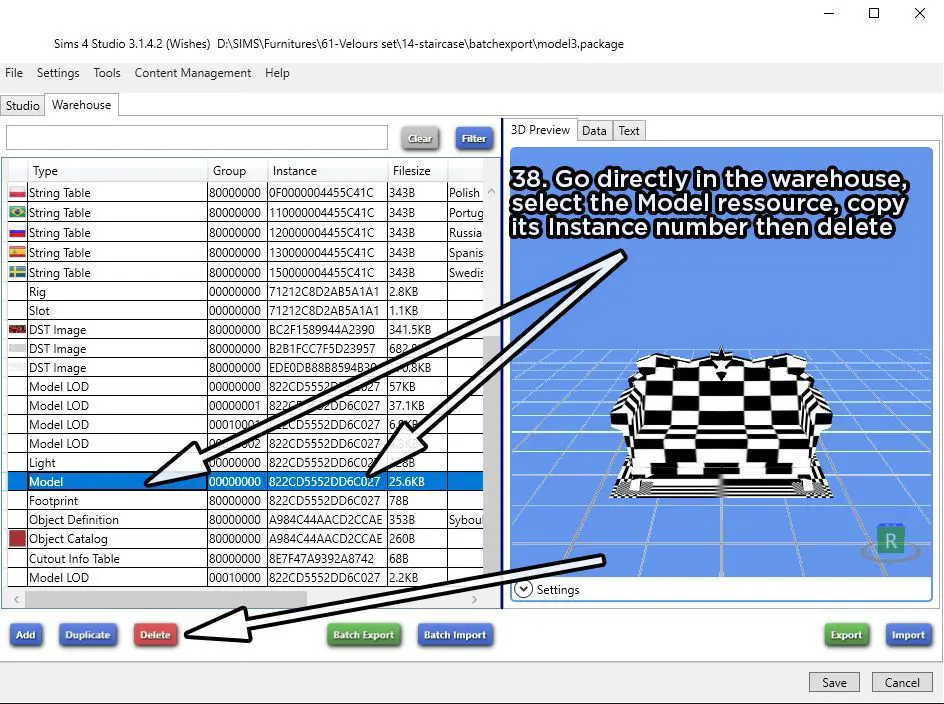
37. Open Sims 4 studio and open your stairs package. As you’ll notice, the file is not completely recognized by the sofware and the information won’t be displayed in the studio. To import the models, we will need to do it separately. But first, go in the warehouse, select the Model ressource of the model 1, click on Batch Export and save without renaming.
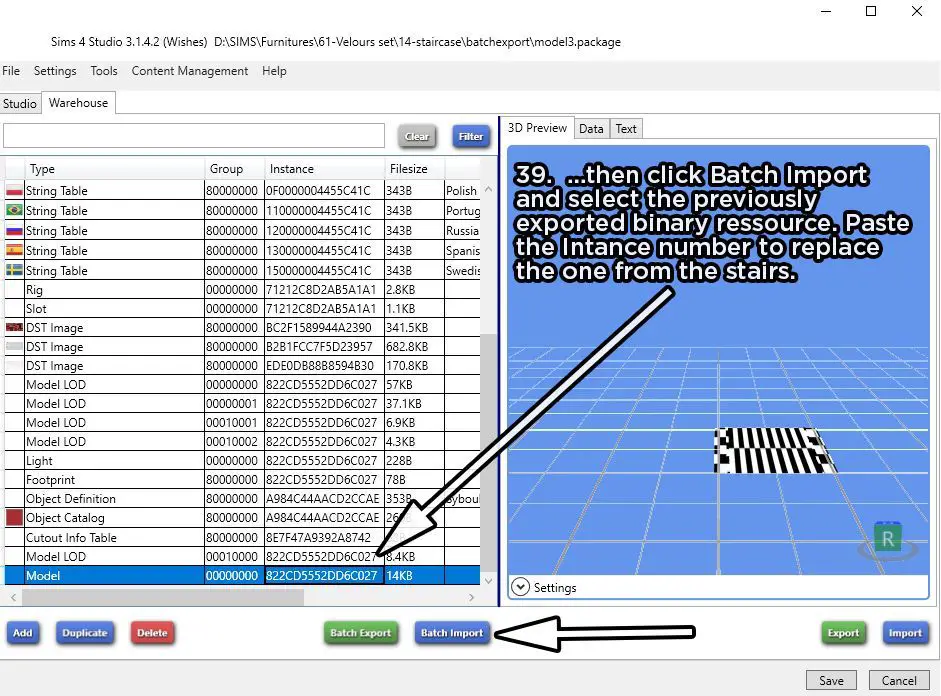
38. Open a new Sims 4 studio window and click on Create 3D mesh, then Objects. Choose whatever object: it does not matter ! For this example, I’m picking the Loveseat sofa. Go directly in the warehouse, select the Model ressource, copy its Instance number, delete and then click Batch Import and select the previously exported binary ressource. Paste the Intance number to replace the one from the stairs.
39. You’ll need to Save, go back to the Menu and reopen the Loveseat package to see the changes. Go in the Meshes tab and import your model 1 blender file. You won’t see anything because the texture doesn’t match. It does not matter. Go in the warehouse, select the Model Ressource and this time, click on Batch export (without renaming the file).
40. Reopen the stair package, go in the warehouse, select the Model Resource of model 1 and copy the Instance number, then delete the ressource.
41. Click on Batch Import, select the ressource from the Loveseat, then paste the instance number of the model 1 into the key Instance field of the Model ressource you just imported.
Now, if this sounds confusing, just watch this video as it will show you the process i’m actually using.
42. You will need to repeat this operation for every mesh of your package, so the 3 Model ressources of model1,2 and 3. For each ressource, I advise to create a new item to be sure that nothing interfere with each other.
43. Finally, we will need to get rid of the shadow LOD as even if you replace them correctly, they ill be responsible for shadow seen through visual bug when SSAO is active in your game. So in the warehouse, delete all three model LOD ressources, then for each Model ressource, click on Lods> Edit Items… , select the shadow Lod and click remove.
Step 5: Final touches
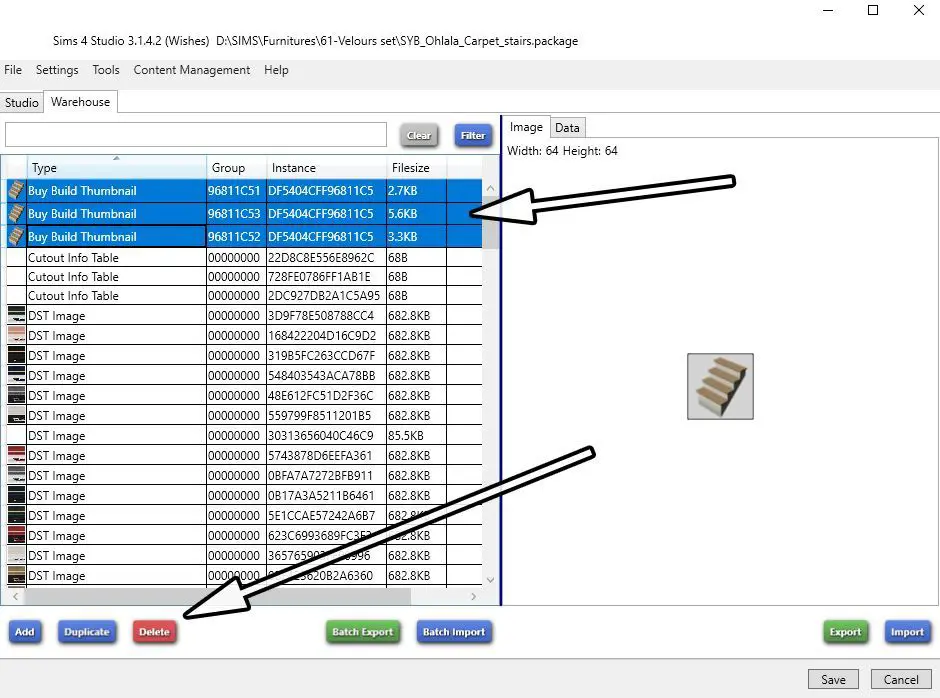
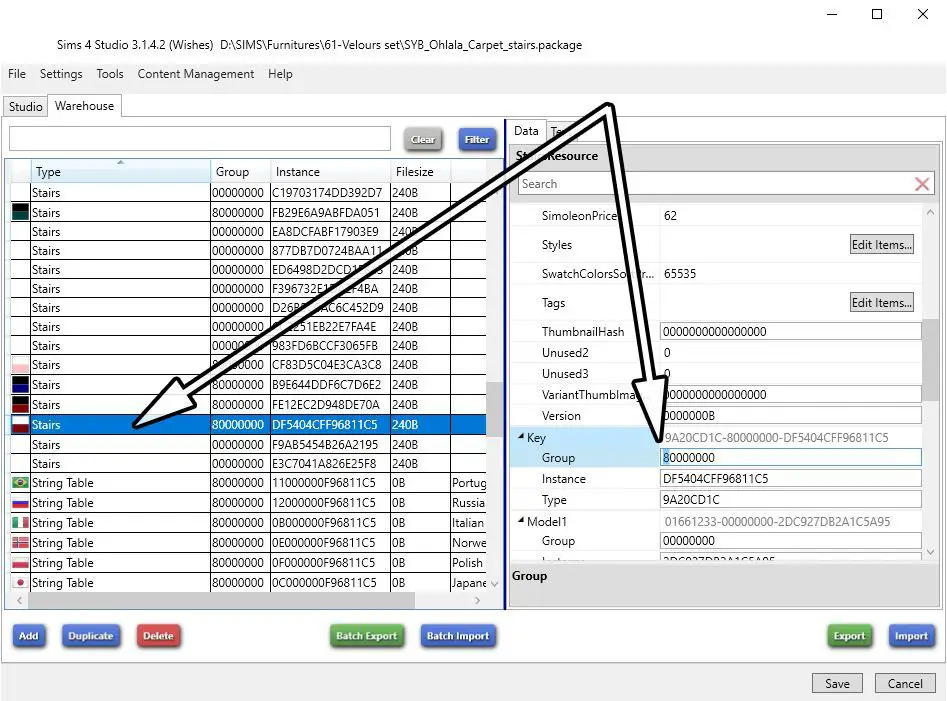
42. We are almost done ! For the game to generate thumbnails, you’ll need to delete the Buy Build thumbnails, and then rename each Stairs group number from 80000000 to 00000000.
And that’s it ! You can test your item ingame.
Troubleshooting
- If anything goes wrong while editing the package in S4S, you can always reopen your save from TSRW and reexport the package to start again.
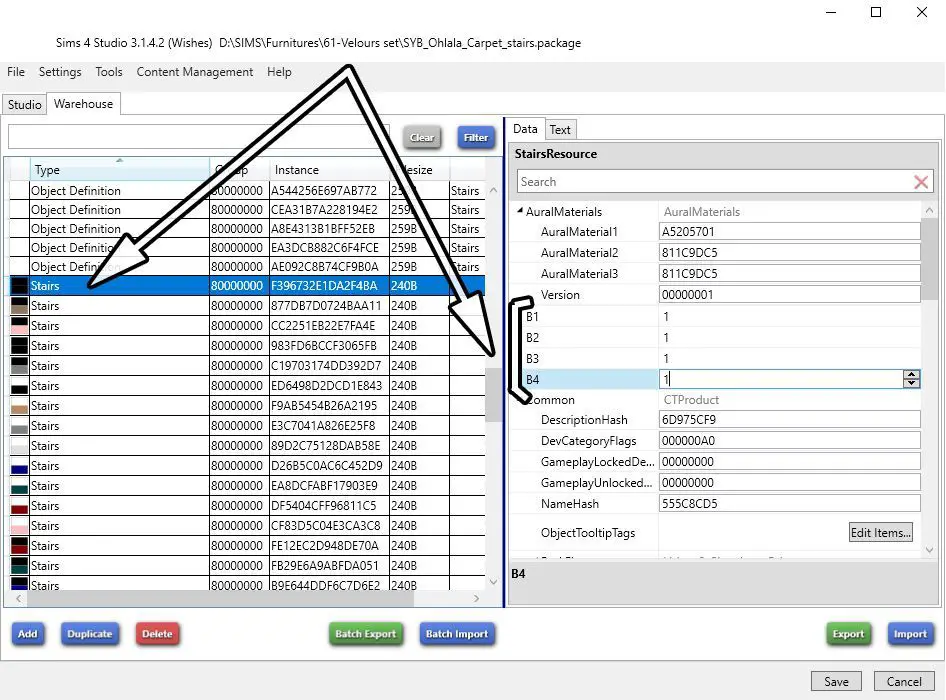
- If you have streched texture issue when stretching the width of your stairs, you might want to change the B1, B2, B3 and B4 of the Stairs ressource from 0 to 1 or 1 to 0. While I don’t know specifically what each one is doing, I understood that they are linked to how the texture and model repeat itself on stretched stairs. The best way to achieve what you want is to clone the stairs that have exactly the behavior you aim for and copy those values.